INTRODUCTION
A frequent request from AGD enthusiasts is the making of a custom menu in order to bring a professional feeling to their project.
This tutorial deals with those progressive steps:
1 – create a simple menu using directly the AGD commands;
2 – analysis of the AGD auto-generated Basic loader;
3 – create a menu with flashing selections through a custom Basic loader;
4 – using the Mikropol screen compressor tool;
5 – how to include background graphics in a custom menu.
The first three steps are very basic arguments; however, as we know, many AGD users are inexperienced and they need to start from the basics in order to clear up any possible doubt.
LET'S PREPARE OUR TOOLS…
Here're some suggestions about the tools we should use:
Choose a ZX Spectrum emulator
Obvious. Working on a real machine could mean a lot more time to spend 🙂
Since i'm only interested to the classic 48K machine (no ULA+ or other improvements), my personal choice is Spectaculator.
A good image editor
It isn't a must because anyway we need ZX Paintbrush, but a professional image editor could result very useful in order to create graphics in the most comfortable way (my preference goes to Corel PhotoPaint).
Always take in mind that the ZX Spectrum screen size is 256x192px wide, divided in 32 columns and 24 rows of single 8x8px character blocks, which in turn have two main colour attributes, one for the ink and another for the paper background.
ZX Paintbrush
http://www.zx-modules.de/zxpaintbrush/zxpaintbrush.html
Indispensable. This screen editor is especially designed to manage the ZX Spectrum graphics. Importing a PNG or GIF image, maybe created with another professional image editor, or just creating our graphics from here, we have the possibility to convert/save the work in a .TAP file, which is needed by the screen compressor.
Mikropol Screen Compressor Plus
http://www.worldofspectrum.org/infoseekid.cgi?id=0012062
It's the way we can convert a graphic screen in a compressed machine code block, in order to evoke it any time we want (or just once, e.g. for a menu background).
BASin
http://everychildcancode.org/basin/
A very useful tool to manage and assemble quickly different program blocks, such as the custom loader, a loading screen and the AGD machine code part. So it's needed here just for a minimal part of its full functionality.
1. HOW TO CREATE A SIMPLE MENU IN AGD
How the CONTROLMENU command works
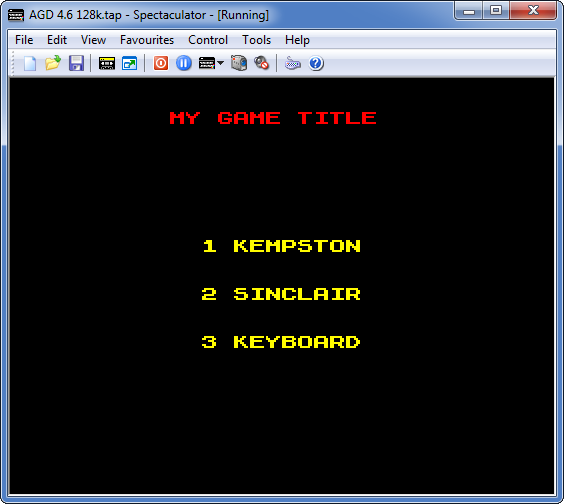
AGD 4.6 uses the CONTROLMENU command, to use in the INTRO/MENU section, where the code is executed before the other game events.
The CONTROLMENU command generates a blank screen in a pause status, waiting for the player to choose between these options:
1 – Kempston joystick;
2 – Sinclair joystick;
(any other value) – Keyboard.
Pressing the relative key, AGD loads at the memory address 32005 the values which will activate the chosen controls:
memory address,value: 32005,1 –> Kempston joystick
(equivalent to POKE 32005,1 in Basic)
memory address,value: 32005,2 –> Sinclair joystick
(equivalent to POKE 32005,2 in Basic)
Any other value different from 1 or 2, will activate the AGD keyboard controls.
The screen is blank! What I have to do?
So the CONTROLMENU command generates a blank screen…
Even if the above three choices are forced, the text is delegated to us.
First of all, we have to create some text rows through the TEXT section (one message for each row), e.g.:
Message #0 – "MY GAME TITLE"
Message #1 – "1 KEYBOARD"
Message #2 – "2 KEMPSTON"
Message #3 – "3 SINCLAIR"
…then, going to the INTRO/MENU section, we can write the code to print the messages before the CONTROLMENU which activates the keypress pause.
Example: into the INTRO/MENU section, we can write…
CLS
LET LINE = 1
LET COLUMN = 9
COLOUR 66
MESSAGE 0
LET LINE = 9
LET COLUMN = 11
COLOUR 70
MESSAGE 1
LET LINE = 12
LET COLUMN = 11
COLOUR 70
MESSAGE 2
LET LINE = 15
LET COLUMN = 11
COLOUR 70
MESSAGE 3
CONTROLMENU
…and here's a simple AGD menu, without graphics.
We have to consider that this isn't a gameplay screen, so we cannot include graphics in the same way we create a game map. However, we could create custom graphics redrawing the character-set (e.g. transforming lowercase letters or symbols through the CHARACTER SET option in AGD), and use the same messages method, though it isn’t an elegant practice.
Otherwise, let's continue to learn how can we get better results.
2. THE AGD BASIC LOADER
Every time we save our project, the program asks if we want AGD to generate an automatic loader. Analyzing the Basic code we'll find this line…
Due to memory saving reasons, AGD hides both the CLEAR and the RANDOMIZE memory addresses. Simply don't care about it: we're going to write our custom Basic loader within few moments.
The CLEAR / RANDOMIZE USR meaning
The Basic command CLEAR reserves a memory area to the machine code program we're going to load, starting from the next byte (e.g. CLEAR 29999 will clear and reserve the memory starting from the 30000 address).
The RANDOMIZE USR command runs the machine code program previously loaded with LOAD ""CODE.
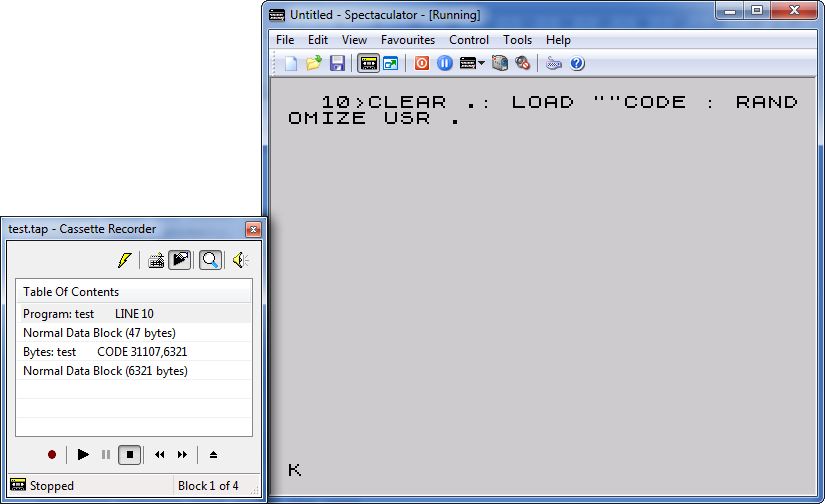
In AGD, any saved game will always run using RANDOMIZE USR 32000, even if the machine code block saved by AGD starts at a lower memory address.
In order to understand the value for the CLEAR command, we just have to check that starting address, visible after a save.
Example: we've saved our AGD project. Using the emulator's virtual tape recorder, we see the starting address 31107…
…so, in this case, our loader should be like this:
Here it is! The "dots" mystery in the AGD loader is finally unveiled; now we're able to start programming our custom loader!
First of all, we have to delete the code inside the INTRO/MENU section, because we no longer need AGD to manage the menu.
Here's an example of a custom loader including a loading screen:
The POKE 23739,111 is a cute trick to avoid the appearing of the "Bytes" text over the loaded graphic screen.
3. CUSTOM LOADER AND MENU FLASHING SELECTIONS
Example of a custom loader using a loading screen and a custom menu:
2 BORDER 0: PAPER 0: INK 0: CLS: PRINT BRIGHT 1; INK 2; AT 1,9; "MY GAME TITLE"
3 PRINT BRIGHT 1; INK 6; AT 9,11; "1 KEYBOARD";AT 12,11; "2 KEMPSTON";AT 15,11; "3 SINCLAIR"
4 PRINT BRIGHT 1; INK 7; AT 19,11; "0 START"
10 LET x=9: PRINT AT x,11; BRIGHT 1; FLASH 1; OVER 1; INK 8;"(10 spaces)": POKE 32005,0
20 IF INKEY$="1" AND x<>9 THEN GO SUB 70: LET x=9: POKE 32005,0: GO SUB 80
30 IF INKEY$="2" AND x<>12 THEN GO SUB 70: LET x=12: POKE 32005,1: GO SUB 80
40 IF INKEY$="3" AND x<>15 THEN GO SUB 70: LET x=15: POKE 32005,2: GO SUB 80
50 IF INKEY$="0" THEN RANDOMIZE USR 32000: GO TO 2
60 GO TO 20
70 PRINT AT x,11; BRIGHT 1; FLASH 0; OVER 1; INK 8;"(10 spaces)": BEEP .033,24: RETURN
80 PRINT AT x,11; BRIGHT 1; FLASH 1; OVER 1; INK 8;"(10 spaces)": RETURN
The Basic code explains itself. Just a note about the method: here we use the OVER 1 and INK 8 trick. It means that the blank flashing spaces will move over a background text, preserving the background colour attribute, at the given coordinates.
After the RANDOMIZE USR 32000 there's the GO TO 2 command, which returns to the custom menu once the play is finished.
Remember to set the correct CLEAR value, depending by your project's starting address.
4. MIKROPOL SCREEN COMPRESSOR PLUS
Between many other similar utilities available, i strongly prefer this one.
The only particular thing we have to do, is to load a screen saved as a TAP file.
My image is a GIF or a PNG, how can i get a TAP file?
Through ZX Paintbrush, just open your image (256x192px, remember?), and select SAVE AS "Simple Tape File". Done!
Now, let's load the TAP screen in our compressor utility (leave the TAPE/HEADER/NORMAL options unchanged):

The program will elaborate four different compressions…

…let's choose the lighter one: not bad at all, we’ve compressed the graphics from 6912 (the standard screen length) to 1931 bytes!
Once we’re back to the main menu, select TAPE/HEADER/COMPRESSED and the SAVE option and let’s save the compressed file as a new TAP file.
The program will save our new file at the memory address 50000 by default.
Good. We can use this file as it is, stored in that address, or choose to save it into another memory address.
How can be readdressed a machine code block?
We have a compressed screen saved in a TAP machine code block, e.g. at the address 50000, 1931 bytes length.
We have checked our game and we need to move the compressed screen routine from the address 50000 to (e.g.) 45000. How can we do? Very easy.
First, let's take note about the bytes length (1931 in our example). Then load the file into the emulator's virtual tape recorder and type:
…this way, the file will be loaded in the desired address. Then re-save it into a new TAP file:
That's why we had to take note about the length.
Done! Now we have a compressed screen, ready to be called at a defined memory address. Magic, isn't it!?
Important: always check the available RAM range!
We always have to consider the memory limits, in order to properly establish where to store our custom machine code routines.
Considering a 48K ZX Spectrum, an AGD project cannot exceed the address 64767.
So, if our AGD game starts at the address 31107 and has a 10000 bytes weight, we could put our machine code routines starting from the address 41107 and within the top-limit address 64767.
5. MENU WITH BACKGROUND GRAPHICS
Here's a self-explanatory Basic list for our final menu, including the call for background graphics and flashing selections:
2 BORDER 0: PAPER 0: INK 0: CLS: RANDOMIZE USR 45000
10 LET x=9: PRINT AT x,11; BRIGHT 1; FLASH 1; OVER 1; INK 8;"(10 spaces)": POKE 32005,0
20 IF INKEY$="1" AND x<>9 THEN GO SUB 70: LET x=9: POKE 32005,0: GO SUB 80
30 IF INKEY$="2" AND x<>12 THEN GO SUB 70: LET x=12: POKE 32005,1: GO SUB 80
40 IF INKEY$="3" AND x<>15 THEN GO SUB 70: LET x=15: POKE 32005,2: GO SUB 80
50 IF INKEY$="0" THEN RANDOMIZE USR 32000: GO TO 2
60 GO TO 20
70 PRINT AT x,11; BRIGHT 1; FLASH 0; OVER 1; INK 8;"(10 spaces)": BEEP .033,24: RETURN
80 PRINT AT x,11; BRIGHT 1; FLASH 1; OVER 1; INK 8;"(10 spaces)": RETURN
In this example, we've considered those variable elements:
– the CLEAR 31106 value assumes that the game starts at 31107;
– the compressed graphic screen is saved at 45000;
– ten blank spaces for flashing selections, which correspond to the text (characters or graphic blocks) positioned at the chosen coordinates;
– the text options is replaced here by the RANDOMIZE USR 45000 command: there's no reason to print text, since we're able to include it directly in the compressed background! If you didn't consider this brilliant solution, and don't want to modify your graphic background, then check the previous version and include the PRINT commands after the RANDOMIZE USR 45000.
FINAL NOTE
Imagine about the possibility to transform our Basic loader in a machine code block (experts know about this operation, it can be done through a compiler utility). It would be a further professional touch, e.g. the player won't be able to BREAK the program by pressing "Shift + Break Space" (which is a typical Basic feature) during the menu event!
We'll talk about the compiler method in another tutorial.
SEP
2016